
Hard to believe I put together my first thermostat in 2015. I started making a stat for our then holiday rental to make something idiot-proof for holiday makers (almost impossible to do incidentally).

I worked my way through various displays and software setups and spent altogether far too long on the subject all the way through 2020, developing a version of my stat for air-source heating (Because the Salus stat that came with the overpriced system was rubbish) and then we started the process of selling up in the UK and moving to Spain – where we have a log burner as main source of heat.
Here on the right is the 2020 version of my stat – with custom dial – which took AGES to realise and which displayed on the now defunct original Node-Red Dashboard – a change which was largely responsible for my move to Home Assistant as I could see much of my work becoming redundant in the future.
Getting all those controls (and more) precisely aligned took more time than I care to think about.
Anyway that was then, this is now.. over in Spain, as well as our log fire we also have a reversible aircon in my office and this time I went down the Home Assistant route rather than creating hardware displays or relying on old Node-Red code.
Meanwhile I’m currently back in our new UK second home for the Christmas and it occurred to me that the one thing I have no remote access to is the oil-fired central heating here in the UK. As both my wife and I have phones and tablets, it makes absolute sense to use those as means of control and information gathering, for example, to display Home Assistant panels.
The original battery-powered thermostat that came with the house is ok, but has no means of being remote-controlled. I can turn the entire boiler off remotely thanks to a smart-plug, but that’s it. A couple of days ago, I set about the task of creating a new remote thermostat. Home Assistant has both a generic thermostat and a generic scheduler built-in, which can easily be deployed to create a thermostat. What’s missing in the standard thermostat is an “aware” mode. So I added that with a little help from Gemini. Of course now that we’re not doing holiday rentals I have no need for the secure controls of previous generations of thermostat.
I started looking up available standard smart stats and realised that there are a number of different types, some for underfloor heating that are definitely not suited to oil-powered systems – indeed quite a few variations and some at RIDICULOUS pricing. In the end, it seemed obvious with my knowledge that I should just simply create my own and this led me to looking up about current systems and when it comes to simple on/off control used in a lot of oil-powered heating systems there’s a lot of reference out there to 24V AC system control.
Indeed, I see that all the time and yet once again, on getting the meter out, I find that there is in fact a pair of wires coming from the heating system to go to the STAT contact pair, feeding 240 volts, not 24 volts, exactly the same as in our original oil-powered system all those years ago.
To be clear, the oil-powered system requires a simple isolated contact set, not a contact pair with live attached at one end as you will find on, for example, most Sonoff smart switches. I dug out my old Sonoff 4ch Pro controller which has been gathering dust for some time. Ok, so 3 of the 4 10A contact sets won’t be used for now but hey…
Clearly, this does not have a temperature sensor. So I figured I would use the Zigbee temperature sensor that I have in the kitchen. But then I thought, well, what happens if that fails? So again, with a little help from Gemini, I set up the living room temperature sensor as a backup.
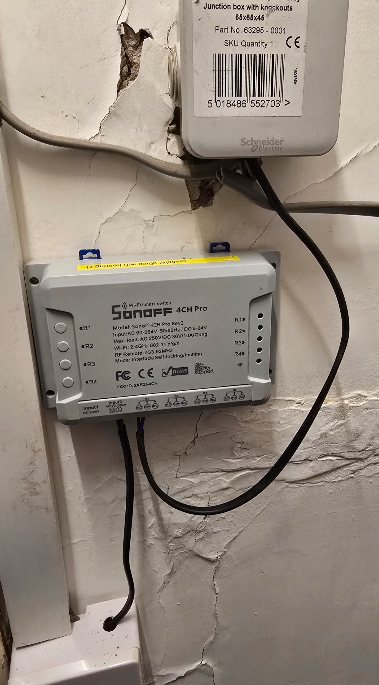
The new stat is up and in place and running in less than a day. Don’t give me nasty looks over the state of the under-stairs cupboard and it’s wiring (right)- we inherited that mess. The box at the top is simply a junction between the two-wire stat control coming in from the heating system in an out-building and the wire off on the right is the wire going into the original stat through the plasterboard wall. So, simply two wires which get shorted when heat is required. I’ve added in the thin black wire you see coming from further down up to the top box.
Meanwhile, the same Sonoff box is getting power from an existing lighting switch socket which, thankfully, has neutral down at the very bottom of the picture. I am using quite thin mains cable because the amount of current that we are talking about here is negligible. Some day I’ll rip the whole lot apart, including that mess of a wall, put a new plasterboard up, and stick a din rail up there. But for now, we have only a couple of days while we’re here over the Christmas, and I wanted to get this up and running.
I’m using first output NO contact pair (which is called R1 on the 4CH Pro unit top) on the Sonoff 4CH Pro. You can see the mechanical overrides on the left-hand side of the Sonoff. You’ve got one button for each output set. I’ve left the original thermostat in place just to be safe, but turned it to OFF mode, which in fact means it will only close it’s contacts if the temperature drops to something like 5 degrees.
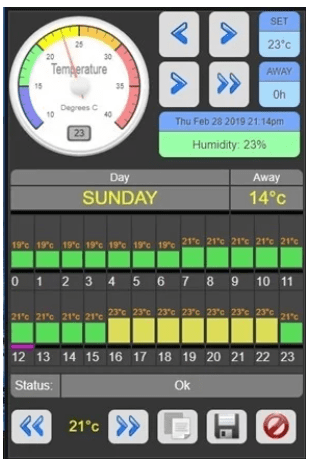
I’ve set my system to come on at a much higher temperature, around 10 degrees, when in the away mode and then, of course, we have active and night modes. Being used to Spanish weather, I like to be warm, so 23°C when active and 16°C overnight.
The cables will be tied down properly, but I doubt very much whether cable ties will actually stay in that wall for very long – it’s a real mess.
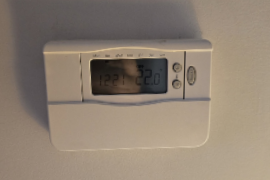
Meanwhile, on the other side of that wall, we have the living room and the original thermostat, which is a battery-powered job. Three AAA batteries have to power a little relay. I can’t imagine them lasting more than a year without being replaced. Normally, that would not be a problem, but we’re not guaranteed to come back every year – I’ve already had this problem with my Aqara battery-powered video doorbell whose batteries are good for maybe 9 months.
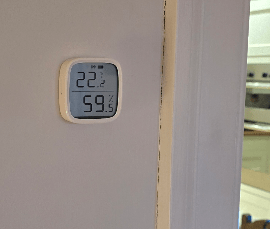
On the other hand, the Sonoff Zigbee temperature and humidity sensors I’ve used are pretty good, and their batteries will last well over a couple of years. Being Zigbee, of course, no wiring is needed, so no problem, they just simply stick to the wall.
And then we have the interface in Home Assistant, and this is what ties everything together – available wherever I or my wife happen to be thanks to the magic of Tailscale VPN.
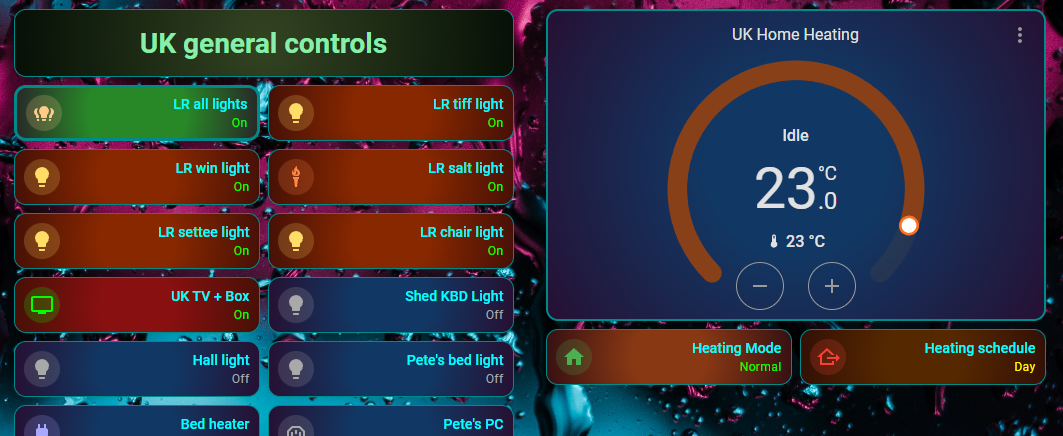
We’ve recently moved lock, stock, and barrel over to Google Home and the Google Nest. So, I don’t have voice control over all of this yet. But the next visit I’ll bring one of those little Google Nest Minis over here and simply add in voice control, for what it’s worth. I could make this stat an awful lot more sophisticated, but it simply isn’t needed. It sits on auto, or I can manually override it for a temporary temperature boost or drop, which will revert back to the scheduled auto value on the next change of schedule. There is a heating mode button to switch between normal and absent. If absent, that thermostat display goes dark and the heat control defaults to a much lower temperature. The heating schedule button on the right is simply for information to tell me that it’s on day or night mode (i.e. working). I don’t really need it, but I thought I’d put it there anyway.
The pretty colours are largely thanks to the Card-Mod add-in to Home Assistant. And so there it is, my last little mini-project of 2025. If anyone wants the YAML code for all of this above, I’ll quite happily make it available with no guarantees.